The UGREEN NASync DXP2800 just landed on my doorstep — and ahead of schedule, too. While I haven’t installed the drives yet (I’m picking them up tomorrow), I thought I’d take the chance to give a proper first look at this budget-friendly NAS. This isn’t a full review or setup guide — that’ll come once everything is up and running — but I wanted to cover unboxing, design, build quality, and my reasons for choosing it in the first place.

Why I Chose the NASync DXP2800
After months of considering whether to stick with cloud storage or go local, I finally made the move toward a proper NAS setup. I’ve been gradually building a smarter home and backing everything up via iCloud — but that only goes so far, especially with Apple’s subscription costs climbing and storage tiers feeling more like a temporary fix than a long-term solution.
Enter the UGREEN NASync DXP2800. What caught my eye wasn’t just the price point (though the early crowdfunding deal definitely helped), but the feature set for the price.
Here’s what stood out:
- Two drive bays, perfect for running RAID 1 for redundancy
- M.2 NVMe support, giving me the option to run Docker apps or system files separately from my storage
- 2.5GbE port, future-proof enough to outpace regular Gigabit
- HDMI out, which I may or may not use, but still nice to have
- Compact form factor, designed to run quietly in a living room without sticking out
For my use case — which is mainly iPhone and MacBook backups, Time Machine, and running lightweight Docker apps like Pi-hole and Home Assistant — it seemed ideal. I didn’t need a powerhouse like Synology’s higher-end models, but I wanted something better than a DIY Pi-based setup.
Unboxing & Build Quality
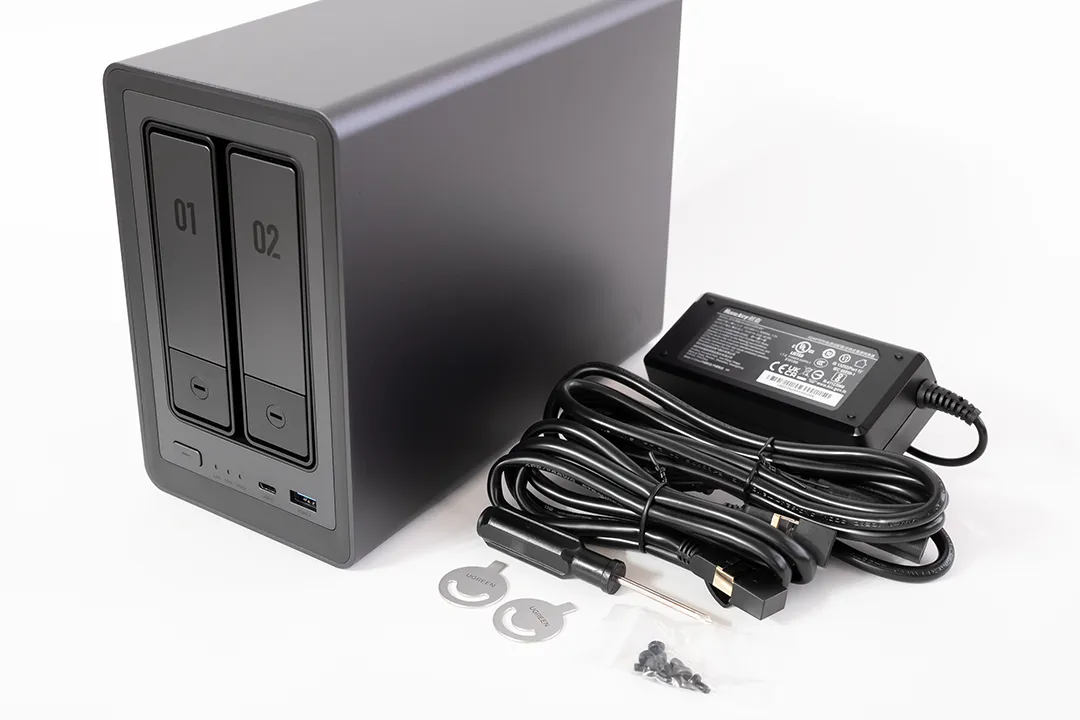
UGREEN has done a great job with the packaging. The NAS arrives in a plain outer box with the product box nested inside, offering an extra layer of protection. Inside, everything is well secured with foam inserts and a clean layout — nothing feels rushed or thrown in. It’s a simple touch, but it sets the tone for a well-thought-out product.
What’s in the box:
- The DXP2800 unit itself
- External power brick with a barrel connector
- Ethernet cable
- Screws for 2.5” SSDs
- Quick start guide

First impressions? It’s solid. The chassis is mostly metal, giving it a premium feel and decent weight. The only plastic bits appear to be the HDD trays, which are tool-less and slide out cleanly behind the magnetic front cover. For a “budget” NAS, it doesn’t feel cheap at all.
The front panel is minimal and clean, with a magnetic cover that hides the two SATA bays. These are tool-less for 3.5” drives, with mounting points and screws included for 2.5” drives.
In terms of ports, you get a surprisingly generous set of options:
- 3 x USB 3.2 (1 front, 2 rear)
- 2 x USB 2.0 (rear)
- 1 x USB-C (front)
- HDMI (rear)
- 2.5GbE LAN
- Power input
Internally, the M.2 NVMe slots are accessed through the front, behind the HDD trays — a clever design that keeps things compact while allowing SSD expansion without dismantling the case. The DIMM slot is accessible through the bottom panel, making RAM upgrades straightforward.

Speaking of RAM — the unit comes pre-installed with an 8GB Samsung DDR5 SODIMM (M425R1GB4BB0-CWMOD). For most home users running backups, media streaming, or light Docker workloads, that’s a really strong out-of-the-box configuration.

Everything about the layout feels well thought out — ports are spaced nicely, airflow is unobstructed, and the whole package is tidy and understated.
First Impressions (Before Setup)
Even without drives installed, I’ve had a bit of a poke around the unit and here’s what stands out so far:
- Very quiet fans: You can barely hear them — a big win since this will be running in my living room, where noise levels matter more than you’d think. I didn’t want something that would whirr away in the background while watching TV or relaxing.
- Good airflow: Side and rear ventilation seem well placed, and the fan design should keep thermals under control even during longer backup sessions.
- Solid-feeling trays and front cover: No wobble, no rattling — everything slides and clicks into place properly.
- Well-planned internals: NVMe access through the drive bays is clever and clean. RAM upgrades are accessible from the underside, which is great for long-term flexibility.
I haven’t booted the OS yet, since I’m waiting on drives — but once I do, I’ll be checking out how intuitive the setup is, how the app integration works, and how flexible the settings are for things like remote backups and energy-saving modes.

🔧 What Else Can You Use the DXP2800 For?
While my focus is on backups and light automation, the DXP2800 is capable of much more. If you’re still deciding how you’ll use a NAS, here are some ideas this model can handle:
- 📁 Private cloud storage – Replace iCloud or Google Drive with your own self-hosted solution
- 🎥 Media streaming server – Host your own Plex or Jellyfin library for local streaming
- 🏠 Smart home hub – Run Docker containers like Home Assistant, MQTT brokers, or automation scripts
- 📷 PoE security camera storage – Use with NVR software like Frigate or Shinobi (I’m currently considering this over a standalone NVR system)
- 🧪 Self-hosted tools – Run apps like Pi-hole, Bitwarden, or even a personal blog/server
Whether you want a quiet companion for daily backups or a multi-purpose home server, there’s plenty of headroom here.
Final Thoughts (For Now)
So far, I’m pretty happy with the NASync DXP2800. It doesn’t try to be everything — and that’s exactly why I picked it. For anyone looking for a quiet, simple, and affordable NAS for local backups and some light automation, it’s shaping up to be a strong contender.
And the fact that it blends into my living room setup without drawing attention or making noise? That’s a huge bonus.
I’m also weighing up whether to use it as part of a PoE security camera system, with NVR software running in Docker. It’s not set in stone yet — I’m still considering the convenience of a standalone NVR — but the flexibility this NAS offers is one of its biggest strengths. Whether you’re keeping things simple or pushing it further, it feels like a solid platform to build around.
I’ll be documenting the full setup process once I get the drives installed, so keep an eye out for that. And if you’re considering this model or have any specific questions, feel free to drop them in the comments — I’ll do my best to include the answers in the next post.
Leave a Reply